
Hansen Cattle Panel Hoop House for ChickensPublished in APPPA Grit Issue 23 (2003) by Jody Padgham. We pro To make this pen: Cut plywood into 4- 90° triangles about 6-8” on the short sides. Cut the short 2x4’s to approximately 100½”. Place the 2x4’s on a flat surface, with the 4”side up, making a rectangle with same size pieces opposite each other and the long pieces on the outside of the ends of the short pieces. Screw the plywood pieces onto each corner, connecting the long and shorter 2x4’s together. Turn the new rectangle over, so the plywoods are on the bottom. Lay the two cattle panels side by side, on top of the rectangle, with the long sides of wood and panel parallel. Lash the panel edges together, to make a center seam, using the wire ties, which you can find in bags by the supplies for chain link fence in your local farm supply store. Use 4-5 ties for the length, and use a plyers to tie off the ends so no one gets scratched. Roll chicken wire crosswise across the short ends of the paired panels. Cut to length, with a little extra on each side so it can be wrapped around. Loosely attach the wire to the bottom edges of the panels with the small plastic ties. Line the middle of the panel seam up with the middle of the short 2x4s. The panels will still be laying flat over the wood rectangle, and should rest about halfway across the longer side 2x4s. With large fence staples, staple the front edge of the paired panels onto the short edge of the rectangle, attaching the bottom of the panel in about the middle of the width (the 4” ) of the 2x4. Walk to the other side of the cattle panels– this end should be sticking out several feet past the wooden rectangle. With another person, push the panel up to make a hoop shape. Bring the bottom edge down tight to the 2x4, and staple the same way as the first end– halfway across the width of the 2x4. Finish attaching the chicken wire to each end of your new ‘hoop house’. Hold the hog panels up to each open side of your hoop. Cut to size, creating a stepping stair shape or leaving straight. Attach the hog panel to each side of the hoop, using wire ties and stapling to the wood. File any sharp edges. You may put chicken wire on each of these sides– needed if you plan to put in very young birds or have a predator problem. The wire can go all the way to the top, but you will have to hinge it somehow on one side, as these high gaps are the pen access. Now the wheels– raise up the pen– drill a hole the size of your lag bolts going into the back side corner of the long 2x4. Place the hole equidistant from all edges (top, bottom, back) (the short sides are the front and back– the wheels go on the outside in the back). Place a washer on each side of the wheel, and screw into place with the lag bolt, allowing freedom to roll. Attach the green tarp to one of the short sides, using plastic ties. You want to put this tarp on the side that the most wind usually comes from (in relation to how you usually pull your pens.) This tarp won’t fit very smoothly, but works well enough to protect the birds. The silver tarp will go from the bottom of the long side (again, the wind-ward side) and up and over about 1/3 of the way down the other side. Use large plastic ties to attach, and then bungie cords to tighten the tarp down. The wheels will either be in the back or front of the tarp, depending on which direction you pull in relation to the wind. This pen is very aerodynamic– if you put the closed side toward the wind, the pens will stay in place in even the worst winds. They are strong enough to hang waterers and feeders from the panel frame (though Mike uses a reservoir and gravity feed system with red bell waterers and pulls hand made feeders tied to the wooden frame). If you have predators you may want to use more chicken wire. If the hog panel side is too high or seems cumbersome for entry, a door may be cut, framed and hinged in the side, but it will add weight. Note: This pen was designed as a typical pasture pen, but late last year Mike decided to try the pens in a day-range model, surrounding six of the pens with poultry netting that was moved weekly. He is very happy with this new system, which has forced him to cut side access doors in each pen for the chickens to wander in and out. Hansen Pen Shopping list
Receive Free PDF Issue of APPPA Grit Newsletter
| Upcoming eventsMembership At a Glance
Consumer Guide
|
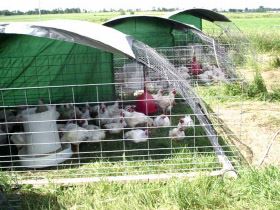 filed Mike and his system this past summer (Issue 21). He has a nifty pen design that costs less than $100 (WI prices, summer 2002) and takes only 1 hour for 1.5 people to build (that’s a spouse chasing kids or a nice sized child.) 8.5 x12 feet in size, the pens are sturdy and lightweight, and have a long life. This pen is very easy to make– I don’t even think Mike measures anything.
 APPPA publishes a weekly newsletter to bring tips, news, and thoughtful commentary about pastured poultry to your inbox. Subscribe and receive a free issue of our bi-monthly trade newsletter, APPPA Grit. We mail APPPA Grit to all paid members bi-monthly.